
Alright, time for my first little lesson. I've recreated the first assignment I was ever given in my program because it's both very simple and very effective in teaching the most basic set of animation principles: A ball bounce. Animating a ball bouncing across a surface and eventually coming to a stop, and doing it properly, teaches you the following basics:
1. Timing - To space your drawings in such a way that you can show acceleration and deceleration. Just about any animator will tell you this is the most important animation principle.
2. Squash and Stretch - To alter the shape, while retaining the volume, of the animated object or character based on its motion. This makes your animation more fluid and shows velocity and impact.
3. Keys and In-Betweens - To draw the most important drawings first and fill in the spaces in between. Doing this, you can see if the timing of your animation is working long before it's even fully animated.
4. Planning - To draw out the path of action the animated object or character will follow and decide where each drawing needs to go on that path (which intertwines with 'Timing'). Having a visible plan before you even start animating anything makes it so you'll never be lost, you'll always know what came before and what comes next.
For this tutorial, I've created animations that are shot on 2's; a term that usually refers to having the video set at 24-frames-per-second, but the drawings are exposed for 2 frames each. This means that the animation itself is effectively running at 12-frames-per-second (and effects like camera-moves would still go at 24fps). This is the standard for most television frame-by-frame animation because it's a time (and money) saver and still effective in showing the principles. Animated feature films are almost always shot on 1's though, meaning a drawing on every frame.
Much of this tutorial is based on doing frame-by-frame animation but it can all be adapted to Flash or 3D animation. The method may be different but the principles are always the same.
So basically the exercise is to show a ball coming in from the left of the screen, bouncing to the right and eventually coming to a stop. Every consecutive bounce needs to be shorter (in height, width and time) than its predecessor until the ball finally stops bouncing. After it stops bouncing, it won't immediately stop moving since the final landing will still carry some velocity, so the ball needs to roll a bit before stopping.
For timing, when the ball is speeding up, the spacing between consecutive drawings needs to consistently get larger. And, of course, when slowing, the space between consecutive drawings gets smaller. Since each bounce needs to be shorter than the one before it, each one needs less drawings than the previous one and, obviously, won't go as high or as far. The ball will move its fastest when leaving the peak of a bounce as gravity accelerates it. It will also leave the ground with a good pop of speed that will slow down as it reaches the next peak.
Keeping all of this in mind, you can draw out a plan that looks something like this:
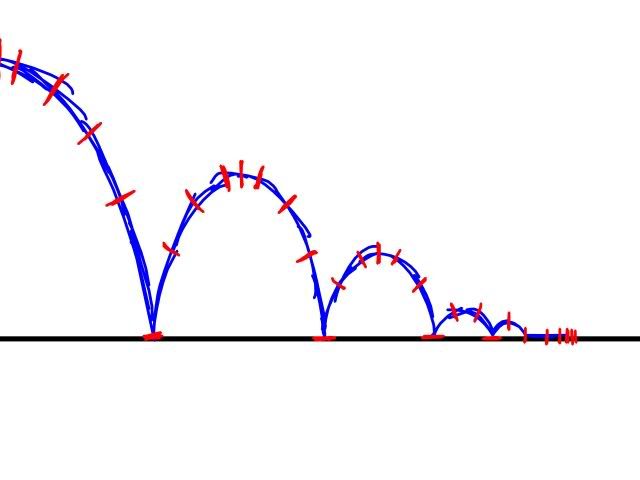
Obviously this looks a little sloppy but I can see the important stuff. I can see the height, distance and arc of every bounce and I can mark off where every drawing goes on them. The last couple bounces only have 2 and 1 drawings which will give the ball a couple of nice small jitters of a bounce just before it totally stops leaving the ground. Note that the drawings get closer and closer together at the end as the ball slows down as it's rolling.
Now that we have a plan, we can pick out the Keys, which are the drawings most important for conveying the action. So basically, thinking about the action, we ask what specifically shows people that a ball is bouncing. The answer would be that it hits the ground and comes back up. So that in mind, our keys will be the very peak and very bottom of every bounce. Since one of the bounces doesn't actually have a drawing marked off for the center/peak of the bounce, we'll just totally fill it in by putting a drawing on both of the indicated spots. We also need to convey that the ball has rolled to a stop at the end, so we'll need one final key on the very last spot. Take note that when the ball hits the ground, we also need to show impact by squashing the ball; since each consecutive bounce has less to it, there will also be less of an impact meaning the ball won't squash quite as much as it did before.
With the keys filled in, we can temporarily extend them to fill up the frames that will later be in-betweens and see what's called an Animatic...or Leica Reel depending on who you ask (seriously, I've gotten very conflicting info on whether there's a difference between these terms or not). Here is my Leica Reel for this animation:
And here it is with the plan showing behind it. As you can see, every drawing falls on a spot indicated by the plan.
Note: In the leica reel, each key-frame should take up it's own spot and all the in-betweens that come after it before the next key. Don't meet the keys half-way in-between or you won't be able to see the timing correctly.
This is the best time in your animation process to decide if you need to change anything. If you go any further, it's a huge pain to have to adjust just about anything; though that's admittedly more true with more complex animation as ball bounces don't take much effort to adjust.
Since I'm happy with the timing, let's move on. Now we fill in the in-betweens. While it's not going to be terribly important for something as simple as a ball-bounce, the common professional method is to find the next-most important drawings on the path of action and do those before finally filling in the rest. These are referred to as 'breakdowns' and are very important in just about any animation with the slightest bit of complexity. If I were to show an updated Leica Reel with breakdowns added in (which I admittedly did not think to prepare for this tutorial), it would contain the in-betweens that would help to show the arcs that the ball moves in.
The last thing to keep in mind as you finish your animation by filling in the left-over drawings is that, while we've shown impact with the ball squashing, we have yet to show speed with the ball stretching. As the ball leaves the peak of an arc, it will stretch out more and more before hitting the ground. It might seem strange to have a drawing where the ball is totally stretched out and then the very next drawing it's totally squashed but it's actually very powerful at conveying the impact and extremely common in professional animation; Looney Tunes is a particularly good example of this with how often characters will fly through the air only to crash into a wall.
One other breakdown you would do before totally filling in the animation would be a drawing somewhere between the end of the last bounce and the last key. Pick one of the spots that favours the end of the animation so you can tell that the ball is slowing down in the updated Leica Reel.
After that, it's simple fill-in-the-blanks work and we get something like this:
And, once more, here it is with the plan behind it:
It's a little harder to see here since all the drawings go by in a twelfth of a second, but again every drawing rests on top of one of the indicated spots on the path of action.
When I first did this assignment, we spent two full classes on it. I don't remember whether it was a 2 or 3 hour class but needless to say, your first go at animation can take a while. In time, all of these principles become second nature and re-doing the assignment for the sake of this tutorial took approximately 25 minutes. A very small bit of that difference can be attributed to the fact that I did not draw every frame this time. I merely created a circle in ToonBoom and moved and transformed it as needed.
Incidentally, this is actually around the 10th time I've done this animation or something very similar to it. Ball bounces, among some others that I'll get to another time, are often considered animation exercises, in that they're something a prepared animator should be able to do at any given time just to warm themselves up. So I encourage aspiring animators to practice this tutorial every so often.
In closing: I hope this helped. I know it's very lengthy and wordy for something that seems really simple but I wanted to be as thorough as possible. Thanks for reading.
No comments:
Post a Comment